The Comprehensive Guide to Router Configuration
Configuring a router is an essential skill for anyone looking to manage a home or small business network. It involves setting up the device that acts as a gateway between your local network and the internet. This guide will take you through the steps of configuring your router, from the initial setup to advanced settings, ensuring a secure and efficient network.
- Understanding Your Router
What is a Router?
A router is a networking device that forwards data packets between computer networks. It performs the traffic directing functions on the internet. When data is sent between devices on different networks, the router ensures it reaches its destination by selecting the best path.
Types of Routers
- Wired Routers: Connect to devices via Ethernet cables. They offer high speed and security but lack the convenience of wireless connectivity.
- Wireless Routers: Provide Wi-Fi connectivity to devices. They are the most common type used in homes and small businesses.
- Core Routers: Used by internet service providers (ISPs) and large organizations, these handle significant amounts of data.
- Edge Routers: Operate at the boundary of the network, connecting internal networks to external networks.
- Preparing for Configuration
Gather Required Information
Before configuring your router, collect the necessary information:
- ISP Details: Username, password, and any specific settings required by your internet service provider.
- Router Details: Default IP address, username, and password (usually found on the router or in the manual).
Connect to Your Router
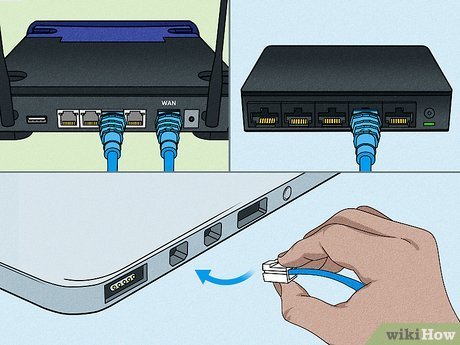
- Physical Connection: Connect your computer to the router using an Ethernet cable. This ensures a stable connection during setup.
- Power Up: Plug in your router and turn it on. Wait for the device to boot up.
Access the Router Interface
- Open a Web Browser: On your connected device, open a web browser.
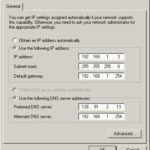
- Enter the IP Address: Type the router’s default IP address (e.g., 192.168.1.1 or 192.168.0.1) into the address bar and press Enter.
- Login: Enter the default username and password. This information is usually “admin/admin” or “admin/password.”
- Basic Router Configuration
Change the Default Login Credentials
For security, change the default login credentials:
- Navigate to the Administration Tab: This is often found under “Settings” or “System.”
- Change Username and Password: Enter a new username and a strong, unique password.
Set Up the Internet Connection
- WAN/Internet Settings: Navigate to the Internet settings section.
- Select Connection Type: Choose the type of connection provided by your ISP (e.g., PPPoE, Static IP, DHCP).
- Enter ISP Details: Input the username, password, and other details provided by your ISP.
- Save and Apply: Save the settings and reboot the router if necessary.
- Wireless Network Configuration
Set Up Wi-Fi Network
- Navigate to Wireless Settings: This is typically found under “Wireless” or “Wi-Fi Settings.”
- Set SSID: Enter a unique name for your wireless network.
- Select Security Mode: Choose WPA2 or WPA3 for better security.
- Set Password: Create a strong password for your Wi-Fi network.
- Save Settings: Apply the changes.
Configure Advanced Wireless Settings
- Channel Selection: Choose a less congested channel to reduce interference (use a Wi-Fi analyzer app to find the best channel).
- Bandwidth: Set the bandwidth to 20MHz for 2.4GHz networks or 40MHz/80MHz for 5GHz networks for better performance.
- Transmit Power: Adjust the transmit power to balance coverage and interference.
- Advanced Router Configuration
Quality of Service (QoS)
QoS prioritizes certain types of traffic to ensure better performance for critical applications:
- Enable QoS: Navigate to the QoS settings and enable it.
- Set Priorities: Assign high priority to applications like VoIP, gaming, or video streaming.
- Save Settings: Apply and save the changes.
Port Forwarding
Port forwarding allows external devices to access services on your local network:
- Navigate to Port Forwarding: This is often found under “Advanced Settings” or “NAT.”
- Add a New Rule: Enter the internal IP address of the device, the external port number, and the internal port number.
- Protocol: Choose the protocol (TCP, UDP, or both).
- Save Rule: Apply the changes.
Dynamic DNS (DDNS)
DDNS updates the IP address associated with a domain name in real-time:
- Enable DDNS: Navigate to the DDNS settings.
- Choose a Provider: Select a DDNS provider (e.g., No-IP, DynDNS).
- Enter Account Details: Input your username, password, and domain name.
- Save Settings: Apply and save the changes.
- Security Settings
Firewall
Enable and configure the router’s firewall to protect your network from external threats:
- Navigate to Firewall Settings: This is often under “Security” or “Advanced Settings.”
- Enable Firewall: Turn on the firewall feature.
- Configure Rules: Set up rules to block or allow specific traffic.
- Save Settings: Apply the changes.
VPN Setup
A VPN provides a secure connection to your network from external locations:
- Navigate to VPN Settings: This is often found under “Advanced” or “Security.”
- Enable VPN: Turn on the VPN feature.
- Configure VPN Client: Input the server address, username, and password.
- Save and Connect: Apply the changes and establish the VPN connection.
- Network Management
DHCP Configuration
DHCP automatically assigns IP addresses to devices on your network:
- Navigate to DHCP Settings: This is often found under “Network” or “LAN Settings.”
- Enable DHCP: Turn on the DHCP server.
- Set IP Range: Define the range of IP addresses to be assigned.
- Save Settings: Apply the changes.
Guest Network
A guest network provides internet access to visitors without exposing your main network:
- Enable Guest Network: Navigate to the wireless settings and enable the guest network.
- Set SSID and Password: Create a unique name and password for the guest network.
- Set Access Restrictions: Limit access to certain websites or devices.
- Save Settings: Apply the changes.
- Maintenance and Troubleshooting
Firmware Updates
Regular firmware updates enhance performance and security:
- Check for Updates: Navigate to the firmware update section.
- Download and Install: Follow the instructions to download and install the latest firmware.
- Reboot Router: Restart the router to apply the updates.
Backup and Restore Settings
Back up your current settings to avoid reconfiguring in case of a reset:
- Navigate to Backup Settings: This is often found under “System” or “Maintenance.”
- Save Backup: Export the current settings to a file.
- Restore Settings: Import the file to restore settings if needed.
Troubleshooting Common Issues
- No Internet Connection:
- Check cable connections and ensure the router is powered on.
- Reboot the router and modem.
- Verify ISP settings and credentials.
- Slow Wi-Fi:
- Change the wireless channel to avoid interference.
- Move the router to a central location.
- Update firmware and adjust QoS settings.
- Forgotten Login Credentials:
- Perform a factory reset by pressing the reset button for 10-15 seconds.
- Reconfigure the router using default login details.
Conclusion
Configuring a router might seem daunting, but with the right approach, it becomes manageable and rewarding. By following this comprehensive guide, you can set up, secure, and optimize your router for the best performance. Regular maintenance and updates will ensure a smooth and secure network experience, allowing you to make the most of your internet connection. Whether for personal or professional use, mastering router configuration is a valuable skill in today’s connected world.