The Ultimate Guide to IP Configuration
Understanding and managing IP configuration is crucial for anyone involved in networking, whether at home or in a business setting. IP (Internet Protocol) configuration is the process of assigning IP addresses to devices on a network, allowing them to communicate effectively. This comprehensive guide will walk you through the fundamentals, types, methods, and best practices for IP configuration.
What is IP Configuration?
IP configuration involves setting up IP addresses for devices on a network. An IP address is a unique identifier assigned to each device connected to a network, enabling communication and data exchange. Proper IP configuration ensures seamless connectivity, efficient network management, and enhanced security.
Types of IP Addresses
- IPv4 Addresses: The most common type, consisting of four sets of numbers (e.g., 192.168.1.1) and providing approximately 4.3 billion unique addresses.
- IPv6 Addresses: Developed to address IPv4 exhaustion, IPv6 uses eight groups of hexadecimal numbers (e.g., 2001:0db8:85a3:0000:0000:8a2e:0370:7334), offering a virtually unlimited number of addresses.
Static vs. Dynamic IP Addresses
- Static IP Address: A permanent address manually assigned to a device. It remains constant until changed manually.
- Dynamic IP Address: Temporarily assigned by a DHCP (Dynamic Host Configuration Protocol) server, it changes periodically.
Why is IP Configuration Important?
- Network Communication: Enables devices to communicate within the network and with external networks.
- Resource Sharing: Facilitates the sharing of resources like printers, files, and internet access.
- Network Management: Helps in network monitoring, troubleshooting, and administration.
- Security: Proper IP configuration enhances network security by controlling access and preventing unauthorized use.
How to Configure IP Addresses
1. Manual Configuration (Static IP)
Steps to Configure Static IP on Windows
- Open Network and Sharing Center:
-
- Click on the network icon in the taskbar.
- Select “Open Network & Internet settings.”
- Go to “Network and Sharing Center.”
- Change Adapter Settings:
-
- Click on “Change adapter settings” on the left pane.
- Right-click on the network connection you want to configure and select “Properties.”
- Internet Protocol Version 4 (TCP/IPv4):
-
- Select “Internet Protocol Version 4 (TCP/IPv4)” and click “Properties.”
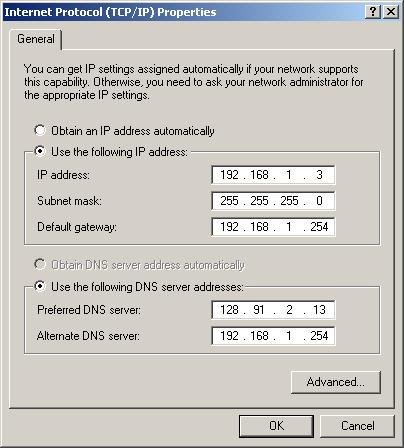
- Enter IP Address:
-
- Select “Use the following IP address.”
- Enter the IP address, Subnet mask, and Default gateway.
- Enter the Preferred and Alternate DNS server addresses.
- Click “OK” to save the settings.
Steps to Configure Static IP on macOS
- Open System Preferences:
-
- Click on the Apple menu and select “System Preferences.”
- Choose “Network.”
- Select Network Interface:
-
- Select the network interface (e.g., Ethernet, Wi-Fi) you want to configure.
- Configure IPv4:
-
- Click on “Advanced.”
- Go to the “TCP/IP” tab.
- Set “Configure IPv4” to “Manually.”
- Enter IP Address:
-
- Enter the IP address, Subnet mask, and Router (gateway) address.
- Enter the DNS server addresses.
- Click “OK” to save the settings and then “Apply.”
2. Automatic Configuration (Dynamic IP)
Using DHCP
DHCP simplifies IP configuration by automatically assigning IP addresses to devices on a network.
Steps to Enable DHCP on Windows
- Open Network and Sharing Center:
-
- Follow the same steps as for Static IP configuration.
- Change Adapter Settings:
-
- Follow the same steps as for Static IP configuration.
- Internet Protocol Version 4 (TCP/IPv4):
-
- Select “Internet Protocol Version 4 (TCP/IPv4)” and click “Properties.”
- Obtain an IP Address Automatically:
-
- Select “Obtain an IP address automatically.”
- Select “Obtain DNS server address automatically.”
- Click “OK” to save the settings.
Steps to Enable DHCP on macOS
- Open System Preferences:
-
- Follow the same steps as for Static IP configuration.
- Select Network Interface:
-
- Follow the same steps as for Static IP configuration.
- Configure IPv4:
-
- Click on “Advanced.”
- Go to the “TCP/IP” tab.
- Set “Configure IPv4” to “Using DHCP.”
- Click “OK” to save the settings and then “Apply.”
3. IP Configuration in Routers
Configuring IP addresses in routers involves setting up the router’s LAN (Local Area Network) and WAN (Wide Area Network) settings.
Accessing the Router Interface
- Connect to the Router:
-
- Connect your computer to the router using an Ethernet cable or Wi-Fi.
- Open a Web Browser:
-
- Type the router’s IP address (e.g., 192.168.1.1) into the browser’s address bar and press Enter.
- Login:
-
- Enter the router’s username and password (usually “admin/admin” or “admin/password”).
Configuring LAN Settings
- Navigate to LAN Settings:
-
- Look for the “LAN” or “Network” settings section.
- Set IP Address Range:
-
- Define the IP address range for the DHCP server (e.g., 192.168.1.2 to 192.168.1.100).
- Save Settings:
-
- Apply and save the settings.
Configuring WAN Settings
- Navigate to WAN Settings:
-
- Look for the “WAN” or “Internet” settings section.
- Select Connection Type:
-
- Choose the connection type provided by your ISP (e.g., PPPoE, Static IP, DHCP).
- Enter ISP Details:
-
- Input the necessary details (e.g., username, password, IP address).
- Save Settings:
-
- Apply and save the settings.
Advanced IP Configuration Techniques
1. Subnetting
Subnetting divides a network into smaller subnetworks, improving performance and security.
Benefits of Subnetting
- Improved Network Performance: Reduces congestion by limiting broadcast traffic.
- Enhanced Security: Segments the network to isolate sensitive data.
- Efficient IP Management: Optimizes IP address allocation.
How to Subnet
- Determine Subnet Mask: Calculate the appropriate subnet mask for the required number of subnets and hosts.
- Divide the Network: Use the subnet mask to divide the network into smaller subnets.
- Assign Subnet Addresses: Allocate IP addresses to each subnet.
2. VLAN Configuration
VLANs (Virtual Local Area Networks) create separate networks within a single physical network.
Benefits of VLANs
- Enhanced Security: Isolates sensitive data from the rest of the network.
- Improved Performance: Reduces broadcast traffic by segmenting the network.
- Flexibility: Allows for dynamic network configuration without physical changes.
How to Configure VLANs
- Access the Router Interface:
-
- Follow the same steps as for basic router configuration.
- Navigate to VLAN Settings:
-
- Look for the “VLAN” or “Network” settings section.
- Create VLANs:
-
- Define VLAN IDs and assign ports to each VLAN.
- Configure the VLAN settings according to your network requirements.
- Save Settings:
-
- Apply and save the settings.
3. IP Address Reservation
IP address reservation assigns a fixed IP address to a specific device on the network, combining the benefits of static and dynamic IP addresses.
Benefits of IP Address Reservation
- Consistency: Ensures that critical devices always have the same IP address.
- Ease of Management: Simplifies network management by avoiding conflicts.
- Enhanced Control: Provides better control over network resources.
How to Reserve IP Addresses
- Access the Router Interface:
-
- Follow the same steps as for basic router configuration.
- Navigate to DHCP Settings:
-
- Look for the “DHCP” or “Network” settings section.
- Create a Reservation:
-
- Enter the device’s MAC address and the desired IP address.
- Save the reservation.
- Save Settings:
-
- Apply and save the settings.
Best Practices for IP Configuration
1. Use a Consistent IP Addressing Scheme
- Plan the Network: Design a logical IP addressing scheme that accommodates current and future needs.
- Document Addresses: Keep a record of assigned IP addresses for reference.
2. Secure Your Network
- Use Strong Passwords: Protect router and device interfaces with strong, unique passwords.
- Enable Firewall: Use router and device firewalls to block unauthorized access.
- Regular Updates: Keep firmware and software updated to protect against vulnerabilities.
3. Monitor and Manage the Network
- Network Monitoring Tools: Use tools to monitor network performance and identify issues.
- Regular Audits: Periodically audit the network to ensure optimal performance and security.
4. Educate Users
- Training: Provide training for network users on best practices for security and usage.
- Policies: Establish clear network usage policies to prevent misuse and maintain security.
Conclusion
IP configuration is a fundamental aspect of network management, essential for ensuring seamless communication, security, and efficiency. Whether you’re setting up a home network or managing a business infrastructure, understanding the basics and advanced techniques of IP configuration will empower you to create a robust and reliable network. By following the steps and best practices outlined in this guide, you can confidently configure and manage IP addresses to optimize your network’s performance and security.